Ich habe kürzlich mein Mailsystem auf LDAP umgestellt und dann auch gleich noch SOGo installiert um CalDAV und CardDAV zu haben. Hauptsächlich zur Nachvollziehbarkeit für mich selbst sind hier die Schritte, die ich auf einem frisch installierten Ubuntu 12.04 durchgeführt habe. Vielleicht hilft es ja auch jemand anderem. Ich hoffe es ist alles komplett. Wenn das mal jemand nachgemacht hat, würde ich mich über einen Kommentar freuen. Auch für Verbesserungsvorschläge der Konfiguration wäre ich dankbar.
Alle Shell eingaben sind als root durchzuführen, wenn nicht anders angegeben. Als hostname verwende ich hier mail.example.com. Die LDAP Base ist dc=example,dc=com.
Zunächst habe ich erstmal etckeeper installiert, da ich meine Konfiguratinsdateien gerne unter Versionsverwaltung habe:
apt-get install etckeeper git
#/etc/etckeeper/etckeeper.conf editieren
etckeeper init
etckeeper commit
diff -u etckeeper.conf.orig etckeeper.conf
--- etckeeper.conf.orig	2012-05-30 21:40:37.536487058 +0200
+++ etckeeper.conf	2012-05-21 16:52:50.197848685 +0200
@@ -1,7 +1,7 @@
 # The VCS to use.
 #VCS="hg"
-#VCS="git"
-VCS="bzr"
+VCS="git"
+#VCS="bzr"
 #VCS="darcs"

 # Options passed to git commit when run by etckeeper.
GOsa wird zur Verwaltung des LDAP Systems genutzt.
apt-get install slapd gosa-schema gosa gosa-plugin-systems gosa-plugin-mail ldap-utils
Ich bevorzuge das rfc2307bis Schema für LDAP-Gruppen. Wer das nis Schema benutzen möchte, kann den nächsten Schritt weglassen.
service slapd stop
rm /etc/ldap/slapd.d/cn=config/cn=schema/cn={2}nis.ldif
cp /etc/ldap/schema/gosa/rfc2307bis.ldif /etc/ldap/slapd.d/cn=config/cn=schema/cn={2}rfc2307bis.ldif
#rfc2307bis.ldif editieren siehe diff
service slapd start
--- ldap/schema/gosa/rfc2307bis.ldif	2011-04-11 13:41:29.000000000 +0200
+++ ldap/slapd.d/cn=config/cn=schema/cn={2}rfc2307bis.ldif	2012-05-23 14:33:14.664485332 +0200
@@ -1,7 +1,7 @@
 #
 ################################################################################
 #
-dn: cn=rfc2307bis,cn=schema,cn=config
+dn: cn=rfc2307bis
 objectClass: olcSchemaConfig
 cn: rfc2307bis
 #
Hier geht es für alle weiter. Es werden die von GOsa benötigten Schemata zum LDAP hinzugefügt:
ldapadd -Y EXTERNAL -H ldapi:/// -f /etc/ldap/schema/gosa/gosystem.ldif
ldapadd -Y EXTERNAL -H ldapi:/// -f /etc/ldap/schema/gosa/gofon.ldif
ldapadd -Y EXTERNAL -H ldapi:/// -f /etc/ldap/schema/gosa/goto.ldif
ldapadd -Y EXTERNAL -H ldapi:/// -f /etc/ldap/schema/gosa/goserver.ldif
ldapadd -Y EXTERNAL -H ldapi:/// -f /etc/ldap/schema/gosa/samba3.ldif
ldapadd -Y EXTERNAL -H ldapi:/// -f /etc/ldap/schema/gosa/gosa-samba3.ldif

#index setzen
ldapmodify -Y EXTERNAL -H ldapi:///
dn: olcDatabase={1}hdb,cn=config
add: olcDbIndex
olcDbIndex: uid eq
olcDbIndex: mail eq
olcDbIndex: cn eq
olcDbIndex: gosaMailAlternateAddress eq
olcDbIndex: postfixMyDestinations eq
Auf http://mail.example.com/gosa den Anweisungen folgen. Je nachdem ob man die rfc2307bis Gruppen im LDAP aktiviert hat, oder nicht muss die entsprechende Einstellung im GOsa Setup gewählt werden.
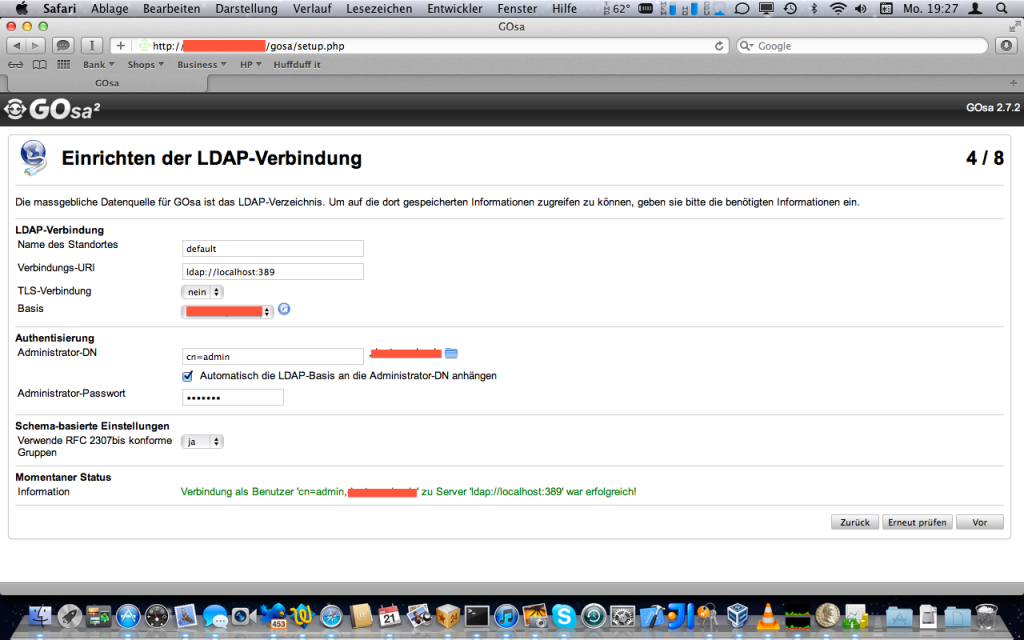
Nachdem man die generierte GOsa Konfiguration gespeichert hat, muss zunächst ein neues System in GOsa angelegt werden:
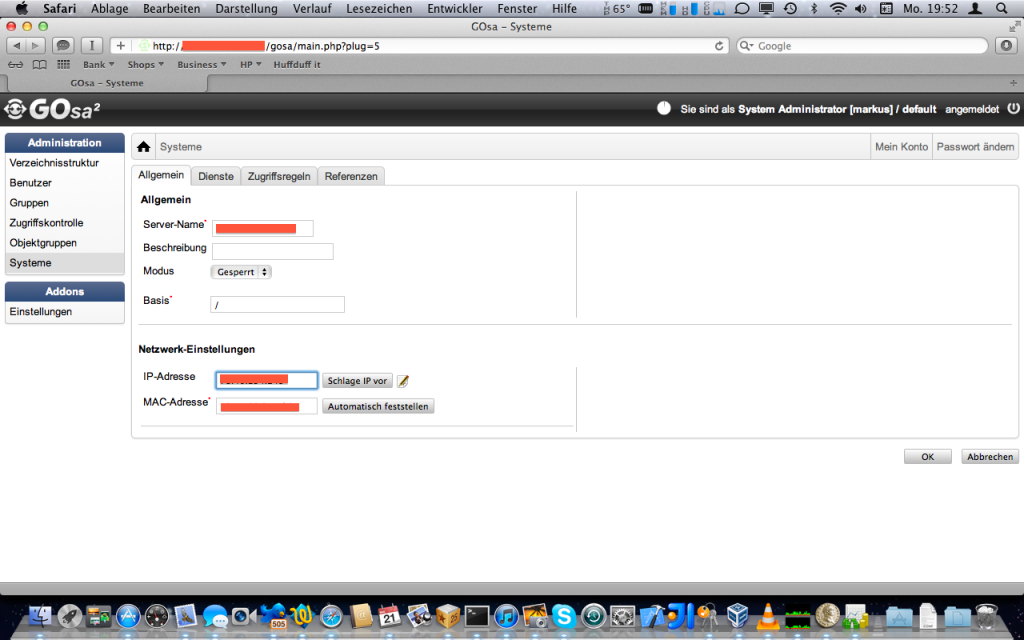
In diesem System kann nun ein neuer Mailserver angelegt werden:
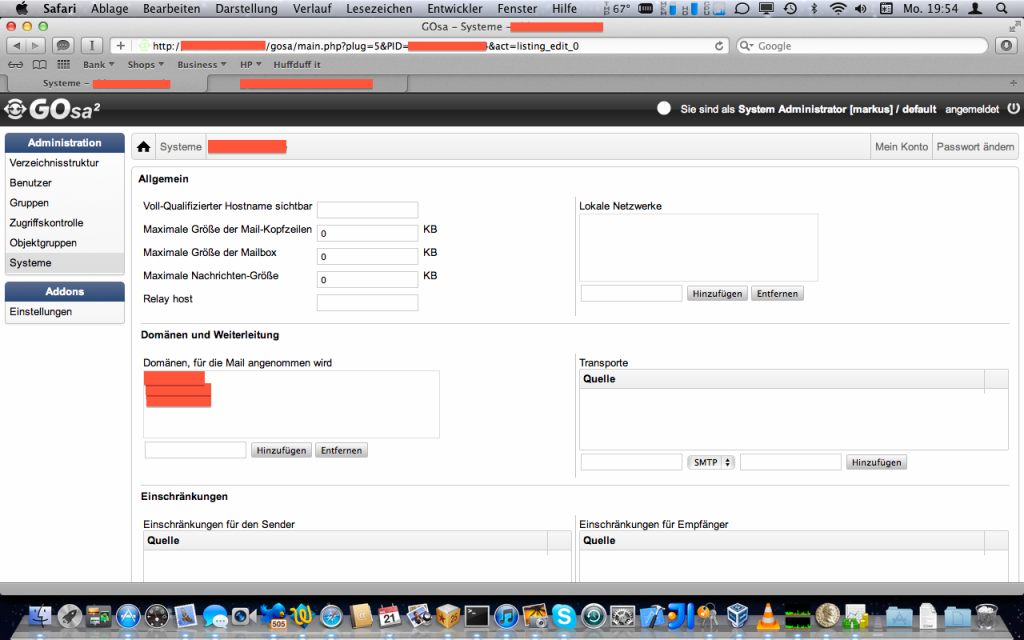
Hierbei ist es wichtig, dass unter dem Punkt “Domänen, für die Mail angenommen wird” der Hostname des Servers eingetragen wird. In diesem Fall also mail.example.com.
Als nächstes werden postfix, dovecot und amavisd-new installiert. pyzor und razor verbessern die SPAM-Erkennungsrate, können aber weggelassen werden, wenn man das möchte. clamav-unofficial-sigs sind SPAM-Signaturen für clamav. mutt ist optional, aber hilfreich beim testen. phpldapadmin ist auch optimal, aber wenn man mal schnell in der LDAP-Datenbank rumeditieren will, ist es ganz hilfreich.
 apt-get install postfix postfix-ldap postfix-policyd-spf-python dovecot-ldap dovecot-imapd dovecot-pop3d dovecot-sieve dovecot-managesieved amavisd-new-postfix pyzor razor clamav-unofficial-sigs mutt phpldapadmin

#alte exim configs entfernen
apt-get --purge remove exim4 exim4-base exim4-config exim4-daemon-light

#damit clamav auf die von amavis bereitgestellten Mails zugreifen darf
adduser clamav amavis

#Mail wird als User vmail unter /var/lib/vmail gespeichert
groupadd -g 800 vmail
useradd -m -u 800 -g 800 -d /var/lib/vmail -s /bin/false vmail
Das auth_username_format wird geändert, damit man sich mit der uid anmelden kann. Ausserdem muss die system Konfiguartion durch die ldap Konfiguration ersetzt werden.
diff --git a/dovecot/conf.d/10-auth.conf b/dovecot/conf.d/10-auth.conf
index d5d2a45..87a9137 100644
--- a/dovecot/conf.d/10-auth.conf
+++ b/dovecot/conf.d/10-auth.conf
@@ -47,7 +47,7 @@
 # the standard variables here, eg. %Lu would lowercase the username, %n would
 # drop away the domain if it was given, or "%n-AT-%d" would change the '@' into
 # "-AT-". This translation is done after auth_username_translation changes.
-#auth_username_format =
+auth_username_format = %n

 # If you want to allow master users to log in by specifying the master
 # username within the normal username string (ie. not using SASL mechanism's
@@ -118,9 +118,9 @@ auth_mechanisms = plain
 #!include auth-deny.conf.ext
 #!include auth-master.conf.ext

-!include auth-system.conf.ext
+#!include auth-system.conf.ext
 #!include auth-sql.conf.ext
-#!include auth-ldap.conf.ext
+!include auth-ldap.conf.ext
 #!include auth-passwdfile.conf.ext
 #!include auth-checkpassword.conf.ext
 #!include auth-vpopmail.conf.ext
In /var/lib/vmail/mail werden die Postfächer der Benutzer gespeichert. Unter /var/lib/vmail/home werden sieve scripts gespeichert.
diff --git a/dovecot/conf.d/10-mail.conf b/dovecot/conf.d/10-mail.conf
index 9c05710..f51402f 100644
--- a/dovecot/conf.d/10-mail.conf
+++ b/dovecot/conf.d/10-mail.conf
@@ -28,6 +28,8 @@
 #
 #
 #mail_location =
+mail_location = maildir:/var/lib/vmail/mail/%u
+mail_home = /var/lib/vmail/home/%u

 # If you need to set multiple mailbox locations or want to change default
 # namespace settings, you can do it by defining namespace sections.
@@ -108,6 +110,8 @@
 # or names.
 #mail_uid =
 #mail_gid =
+mail_uid = vmail
+mail_gid = vmail

 # Group to enable temporarily for privileged operations. Currently this is
 # used only with INBOX when either its initial creation or dotlocking fails.
Die Auth-Listener von Dovecot müssen die richtigen Berechtigungen haben:
diff --git a/dovecot/conf.d/10-master.conf b/dovecot/conf.d/10-master.conf
index f0e79ab..96ec2e5 100644
--- a/dovecot/conf.d/10-master.conf
+++ b/dovecot/conf.d/10-master.conf
@@ -81,13 +81,18 @@ service auth {
   unix_listener auth-userdb {
     #mode = 0600
     #user =
-    #group =
+    #group =
+    user = vmail
+    group = vmail
   }

   # Postfix smtp-auth
-  #unix_listener /var/spool/postfix/private/auth {
+  unix_listener /var/spool/postfix/private/auth {
   #  mode = 0666
-  #}
+    mode = 0660
+    user = postfix
+    group = postfix
+  }

   # Auth process is run as this user.
   #user = $default_internal_user
Dovecot LDAP Konfiguration:
diff --git a/dovecot/dovecot-ldap.conf.ext b/dovecot/dovecot-ldap.conf.ext
index 7dcc748..21e4204 100644
--- a/dovecot/dovecot-ldap.conf.ext
+++ b/dovecot/dovecot-ldap.conf.ext
@@ -14,7 +14,7 @@
 #        by * none

 # Space separated list of LDAP hosts to use. host:port is allowed too.
-#hosts =
+hosts = localhost

 # LDAP URIs to use. You can use this instead of hosts list. Note that this
 # setting isn't supported by all LDAP libraries.
@@ -22,10 +22,10 @@

 # Distinguished Name - the username used to login to the LDAP server.
 # Leave it commented out to bind anonymously (useful with auth_bind=yes).
-#dn =
+dn = cn=admin,dc=example,dc=com

 # Password for LDAP server, if dn is specified.
-#dnpass =
+dnpass = LDAP_PASSWORD

 # Use SASL binding instead of the simple binding. Note that this changes
 # ldap_version automatically to be 3 if it's lower. Also note that SASL binds
@@ -64,7 +64,7 @@
 # The pass_filter is used to find the DN for the user. Note that the pass_attrs
 # is still used, only the password field is ignored in it. Before doing any
 # search, the binding is switched back to the default DN.
-#auth_bind = no
+auth_bind = yes

 # If authentication binding is used, you can save one LDAP request per login
 # if users' DN can be specified with a common template. The template can use
@@ -87,7 +87,7 @@

 # LDAP base. %variables can be used here.
 # For example: dc=mail, dc=example, dc=org
-base =
+base = ou=people,dc=example,dc=com

 # Dereference: never, searching, finding, always
 #deref = never
@@ -112,6 +112,7 @@ base =
 #   %n - user part in user@domain, same as %u if there's no domain
 #   %d - domain part in user@domain, empty if user there's no domain
 #user_filter = (&(objectClass=posixAccount)(uid=%u))
+user_filter = (&(objectClass=gosaMailAccount)(uid=%n))

 # Password checking attributes:
 #  user: Virtual user name (user@domain), if you wish to change the
@@ -120,6 +121,7 @@ base =
 # There are also other special fields which can be returned, see
 # http://wiki2.dovecot.org/PasswordDatabase/ExtraFields
 #pass_attrs = uid=user,userPassword=password
+pass_attrs = uid=user,userPassword=password

 # If you wish to avoid two LDAP lookups (passdb + userdb), you can use
 # userdb prefetch instead of userdb ldap in dovecot.conf. In that case you'll
@@ -130,10 +132,11 @@ base =

 # Filter for password lookups
 #pass_filter = (&(objectClass=posixAccount)(uid=%u))
+pass_filter = (&(objectClass=gosaMailAccount)(|(uid=%u)(mail=%u)))

 # Attributes and filter to get a list of all users
-#iterate_attrs = uid=user
-#iterate_filter = (objectClass=posixAccount)
+iterate_attrs = uid=user
+iterate_filter = (objectClass=gosaMailAccount)

 # Default password scheme. "{scheme}" before password overrides this.
 # List of supported schemes is in: http://wiki2.dovecot.org/Authentication
Mailaddressen zu alias auflösen:
diff --git a/postfix/ldap-virtual_alias_maps.cf b/postfix/ldap-virtual_alias_maps.cf
new file mode 100644
index 0000000..4f5362c
--- /dev/null
+++ b/postfix/ldap-virtual_alias_maps.cf
@@ -0,0 +1,8 @@
+server_host = ldap://localhost
+search_base = ou=people,dc=example,dc=com
+bind = no
+
+query_filter = (&(objectclass=gosaMailAccount)(|(|(mail=%s)(gosaMailAlternateAddress=%s))(uid=%s)))
+result_attribute = uid
+#domain = domain.tld
+
LDAP-Gruppen auflösen:
diff --git a/postfix/ldap-virtual_alias_maps_groups.cf b/postfix/ldap-virtual_alias_maps_groups.cf
new file mode 100644
index 0000000..8b0ca10
--- /dev/null
+++ b/postfix/ldap-virtual_alias_maps_groups.cf
@@ -0,0 +1,8 @@
+server_host = ldap://localhost
+search_base = ou=groups,dc=example,dc=com
+bind = no
+
+query_filter = (&(objectclass=gosaMailAccount)(|(mail=%s)(gosaMailAlternateAddress=%s)))
+result_attribute = memberUid, gosaMailForwardingAddress
+#domain = domain.tld
+
LDAP Abfrage um die Domains herauszufinden, für die wir Mail akzeptieren:
diff --git a/postfix/ldap-virtual_mailbox_domains.cf b/postfix/ldap-virtual_mailbox_domains.cf
new file mode 100644
index 0000000..fe94808
--- /dev/null
+++ b/postfix/ldap-virtual_mailbox_domains.cf
@@ -0,0 +1,7 @@
+server_host = ldap://localhost
+search_base = ou=systems,dc=example,dc=com
+bind = no
+
+query_filter = (|(postfixMyDestinations=%s))
+result_attribute = postfixMyDestinations
+
LDAP Abfrage um den Mailboxnamen zu einer Mailaddresse herauszufinden:
diff --git a/postfix/ldap-virtual_mailbox_maps.cf b/postfix/ldap-virtual_mailbox_maps.cf
new file mode 100644
index 0000000..8b8322a
--- /dev/null
+++ b/postfix/ldap-virtual_mailbox_maps.cf
@@ -0,0 +1,7 @@
+server_host = ldap://localhost
+search_base = ou=people,dc=example,dc=com
+bind = no
+
+query_filter = (&(objectclass=gosaMailAccount)(|(mail=%s)(gosaMailAlternateAddress=%s)))
+result_attribute = uid
+
Die LDAP Abfragen dem Postfix bekannt machen und Dovecot als Delivery und SASL Autentifizeirung konfigurieren:
diff --git a/postfix/main.cf b/postfix/main.cf
index c1acd07..a5b3c34 100644
--- a/postfix/main.cf
+++ b/postfix/main.cf
@@ -31,12 +31,33 @@ myhostname = mail.example.com
 alias_maps = hash:/etc/aliases
 alias_database = hash:/etc/aliases
 myorigin = /etc/mailname
-mydestination = mail.example.com, localhost.example.com, , localhost
+mydestination = localhost.example.com, , localhost
 relayhost =
 mynetworks = 127.0.0.0/8 [::ffff:127.0.0.0]/104 [::1]/128
 mailbox_size_limit = 0
 recipient_delimiter = +
 inet_interfaces = all
+inet_protocols = all
+
+smtpd_sasl_type = dovecot
+
+# Can be an absolute path, or relative to $queue_directory
+# Debian/Ubuntu users: Postfix is setup by default to run chrooted, so it is best to leave it as-is below
+smtpd_sasl_path = private/auth
+
+# and the common settings to enable SASL:
+smtpd_sasl_auth_enable = yes
+smtpd_recipient_restrictions = permit_mynetworks, permit_sasl_authenticated, reject_unauth_destination, check_policy_service unix:private/policy-spf
+
 content_filter = smtp-amavis:[localhost]:10024
 policy-spf_time_limit = 3600s
-smtpd_recipient_restrictions = permit_mynetworks, reject_unauth_destination, check_policy_service unix:private/policy-spf
+
+virtual_mailbox_maps = ldap:/etc/postfix/ldap-virtual_mailbox_maps.cf
+virtual_mailbox_domains = ldap:/etc/postfix/ldap-virtual_mailbox_domains.cf
+virtual_alias_maps = ldap:/etc/postfix/ldap-virtual_alias_maps_groups.cf, ldap:/etc/postfix/ldap-virtual_alias_maps.cf
+
+virtual_gid_maps = static:vmail
+virtual_uid_maps = static:vmail
+virtual_transport = dovecot
+dovecot_destination_recipient_limit = 1
+
Dovecot als delivery agent dem Postfix bekannt machen:
diff --git a/postfix/master.cf b/postfix/master.cf
index 35512c9..746d5b2 100644
--- a/postfix/master.cf
+++ b/postfix/master.cf
@@ -110,6 +110,9 @@ scalemail-backend unix      -       n       n       -       2       pipe
 mailman   unix  -       n       n       -       -       pipe
   flags=FR user=list argv=/usr/lib/mailman/bin/postfix-to-mailman.py
   ${nexthop} ${user}
+#dovecot
+dovecot   unix  -       n       n       -       -       pipe
+    flags=DRhu user=vmail:vmail argv=/usr/lib/dovecot/deliver -d ${recipient} -f ${sender}

 # ==========================================================================
 # service type  private unpriv  chroot  wakeup  maxproc command + args
Virenscanner und SPAM-Checker im amavis aktivieren:
diff --git a/amavis/conf.d/15-content_filter_mode b/amavis/conf.d/15-content_filter_mode
index 57c62c8..7b1a2ac 100644
--- a/amavis/conf.d/15-content_filter_mode
+++ b/amavis/conf.d/15-content_filter_mode
@@ -10,8 +10,8 @@ use strict;
 # If You wish to enable it, please uncomment the following lines:

-#@bypass_virus_checks_maps = (
-#   \%bypass_virus_checks, \@bypass_virus_checks_acl, \$bypass_virus_checks_re);
+@bypass_virus_checks_maps = (
+   \%bypass_virus_checks, \@bypass_virus_checks_acl, \$bypass_virus_checks_re);

 #
@@ -21,7 +21,7 @@ use strict;
 # If You wish to enable it, please uncomment the following lines:

-#@bypass_spam_checks_maps = (
-#   \%bypass_spam_checks, \@bypass_spam_checks_acl, \$bypass_spam_checks_re);
+@bypass_spam_checks_maps = (
+   \%bypass_spam_checks, \@bypass_spam_checks_acl, \$bypass_spam_checks_re);

 1;  # ensure a defined return
Sieve support konfigurieren:
diff --git a/dovecot/conf.d/15-lda.conf b/dovecot/conf.d/15-lda.conf
index 609023a..4b7a2de 100644
--- a/dovecot/conf.d/15-lda.conf
+++ b/dovecot/conf.d/15-lda.conf
@@ -44,5 +44,5 @@

 protocol lda {
   # Space separated list of plugins to load (default is global mail_plugins).
-  #mail_plugins = $mail_plugins
+  mail_plugins = $mail_plugins sieve
 }
SOGo nutzt den Port 2000 für Sieve:
diff --git a/dovecot/conf.d/20-managesieve.conf b/dovecot/conf.d/20-managesieve.conf
index a73a417..e5e17cf 100644
--- a/dovecot/conf.d/20-managesieve.conf
+++ b/dovecot/conf.d/20-managesieve.conf
@@ -9,9 +9,9 @@ service managesieve-login {
   #  port = 4190
   #}

-  #inet_listener sieve_deprecated {
-  #  port = 2000
-  #}
+  inet_listener sieve_deprecated {
+    port = 2000
+  }

   # Number of connections to handle before starting a new process. Typically
   # the only useful values are 0 (unlimited) or 1. 1 is more secure, but 0
SOGo benötigt für einige Regeln imapflags:
diff --git a/dovecot/conf.d/90-sieve.conf b/dovecot/conf.d/90-sieve.conf
index 516ac46..79de623 100644
--- a/dovecot/conf.d/90-sieve.conf
+++ b/dovecot/conf.d/90-sieve.conf
@@ -45,6 +45,7 @@ plugin {
   # deprecated imapflags extension in addition to all extensions thatwere
   # already enabled by default.
   #sieve_extensions = +notify +imapflags
+  sieve_extensions = +imapflags

   # The Pigeonhole Sieve interpreter can have plugins of its own. Using this
   # setting, the used plugins can be specified. Check the Dovecot wiki
An dieser stelle sollte das Mail-System funktionieren.
Zunächst muss das SOGo repository in apt eingebunden werden. Ich habe den nightly build von SOGo 2.0 genommen, die Konfiguration sollte aber auch für SOGo 1.x passen.
/etc/apt/sources.list.d/sogo.list:
deb http://inverse.ca/ubuntu-nightly precise precise
#deb http://inverse.ca/ubuntu precise precise
Apache kann automatisch konfiguriert werden. Für mysql sollte ein Passwort gesetzt werden. phpmyadmin ist optional, aber hilfreich wenn man mal in der Datenbank rumfuhrwerken will. Ich werde spöter phpmyadmin dazu benutzen die SOGo Datenbank anzulegen, aber das kann man natürich auch über die shell machen.
apt-key adv --keyserver keys.gnupg.net --recv-key 0x810273C4
apt-get update
apt-get install sogo mysql-server phpmyadmin memcached
Es müssen noch ein paar module für den apache aktiviert werden:
a2enmod proxy
a2enmod proxy_http
a2enmod rewrite
a2enmod substitute
SOGo legt seine config im home directory des sogo Benutzers an. Das liegt allerdings nicht unter /etc und wird daher nicht vom etckeeper verwaltet. Das ist doof. Deshalb verschiebe ich das home directory nach /etc/sogo:
/etc/init.d/sogo stop
usermod -m -d /etc/sogo sogo
Jetzt wird auch die SOGo Datenbank angelegt. Ich habe phpmyadmin dazu benutzt:
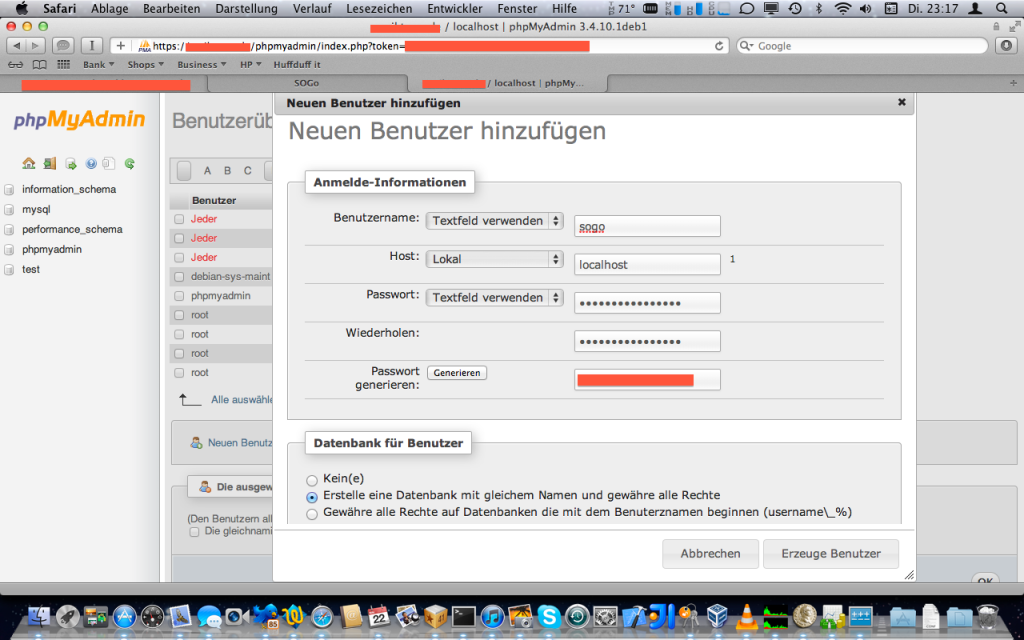
Und hier ist meine SOGo Konfigurationsdatei.:
diff --git a/sogo/GNUstep/Defaults/.GNUstepDefaults b/sogo/GNUstep/Defaults/.GNUstepDefaults
index 8c01f2e..e2f0438 100644
--- a/sogo/GNUstep/Defaults/.GNUstepDefaults
+++ b/sogo/GNUstep/Defaults/.GNUstepDefaults
@@ -7,6 +7,102 @@
     </dict>
     <key>sogod</key>
     <dict>
+        <key>OCSFolderInfoURL</key>
+        <string>mysql://sogo:MYSQL_PASSWORD@localhost:3306/sogo/sogo_folder_info</string>
+        <key>OCSSessionsFolderURL</key>
+        <string>mysql://sogo:MYSQL_PASSWORD@localhost:3306/sogo/sogo_sessions_folder</string>
+        <key>SOGoACLsSendEMailNotifications</key>
+        <string>YES</string>
+        <key>SOGoAppointmentSendEMailNotifications</key>
+        <string>YES</string>
+        <key>SOGoAuthenticationMethod</key>
+        <string>LDAP</string>
+        <key>SOGoPasswordChangeEnabled</key>
+        <string>YES</string>
+        <key>SOGoEnablePublicAccess</key>
+        <string>YES</string>
+        <key>SOGoFirstDayOfWeek</key>
+        <string>1</string>
+        <key>SOGoFirstWeekOfYear</key>
+        <string>First4DayWeek</string>
+        <key>SOGoFoldersSendEMailNotifications</key>
+        <string>YES</string>
+        <key>SOGoLanguage</key>
+        <string>German</string>
+        <key>SOGoMailDomain</key>
+        <string>example.com</string>
+        <key>SOGoMailMessageCheck</key>
+        <string>every_minute</string>
+        <key>SOGoProfileURL</key>
+        <string>mysql://sogo:MYSQL_PASSWORD@localhost:3306/sogo/sogo_user_profile</string>
+        <key>SOGoSieveScriptsEnabled</key>
+        <string>YES</string>
+        <key>SOGoSieveServer</key>
+        <string>sieve://localhost:2000</string>
+        <key>SOGoTimeZone</key>
+        <string>Europe/Berlin</string>
+        <key>SOGoUserSources</key>
+        <array>
+            <dict>
+                <key>CNFieldName</key>
+                <string>cn</string>
+                <key>IMAPHostFieldName</key>
+                <string>gosaMailServer</string>
+                <key>UIDFieldName</key>
+                <string>uid</string>
+                <key>IMAPLoginFieldName</key>
+                <string>uid</string>
+                <key>baseDN</key>
+                <string>ou=people,dc=example,dc=com</string>
+                <key>bindDN</key>
+                <string>cn=admin,dc=example,dc=com</string>
+                <key>bindFields</key>
+                <string>uid</string>
+                <key>bindPassword</key>
+                <string>LDAP_PASSWORD</string>
+                <key>canAuthenticate</key>
+                <string>YES</string>
+                <key>displayName</key>
+                <string>Shared Addresses</string>
+                <key>hostname</key>
+                <string>localhost</string>
+                <key>id</key>
+                <string>public</string>
+                <key>isAddressBook</key>
+                <string>YES</string>
+                <key>port</key>
+                <string>389</string>
+                <key>type</key>
+                <string>ldap</string>
+            </dict>
+           <dict>
+                <key>CNFieldName</key>
+                <string>cn</string>
+                <key>IDFieldName</key>
+                <string>cn</string>
+                <key>UIDFieldName</key>
+                <string>cn</string>
+                <key>baseDN</key>
+                <string>ou=groups,dc=example,dc=com</string>
+                <key>bindDN</key>
+                <string>cn=admin,dc=example,dc=com</string>
+                <key>bindPassword</key>
+                <string>LDAP_PASSWORD</string>
+                <key>canAuthenticate</key>
+                <string>YES</string>
+                <key>displayName</key>
+                <string>Groups</string>
+                <key>hostname</key>
+                <string>127.0.0.1</string>
+                <key>id</key>
+                <string>t-srv_groups</string>
+                <key>isAddressBook</key>
+                <string>YES</string>
+                <key>port</key>
+                <string>389</string>
+            </dict>
+        </array>
     </dict>
 </dict>
-</plist>
\ No newline at end of file
+</plist>
+
Die Apache Konfiguration für SOGo muss noch angepasst werden. Den Teil mit der Erstellung von SSL Zertifikaten habe ich hier mal rausgelassen.
diff --git a/apache2/conf.d/SOGo.conf b/apache2/conf.d/SOGo.conf
index 040814e..64ed4a2 100644
--- a/apache2/conf.d/SOGo.conf
+++ b/apache2/conf.d/SOGo.conf
@@ -30,6 +30,14 @@ ProxyRequests Off
 SetEnv proxy-nokeepalive 1
 ProxyPreserveHost On

+#timezone fix
+RequestHeader unset Accept-Encoding
+
+AddOutputFilterByType SUBSTITUTE text/calendar text/xml
+Substitute 's|^RRULE:([A-Z].+[A-Za-z0-9]);?FREQ=([A-Za-z]*)(;?.*)$|RRULE:FREQ=$2;$1$3|'
+#Substitute 's|RRULE:BYDAY=-1SU;FREQ=YEARLY;BYMONTH=10|RRULE:FREQ=YEARLY;BYDAY=-1SU;BYMONTH=10|n'
+#Substitute 's|RRULE:BYDAY=-1SU;FREQ=YEARLY;BYMONTH=3|RRULE:FREQ=YEARLY;BYDAY=-1SU;BYMONTH=3|n'
+
 # When using CAS, you should uncomment this and install cas-proxy-validate.py
 # in /usr/lib/cgi-bin to reduce server overloading
 #
@@ -65,3 +73,55 @@ ProxyPass /SOGo http://127.0.0.1:20000/SOGo retry=0
 # header of emails.
 RewriteEngine On
 RewriteRule ^/SOGo/(.*)$ /SOGo/$1 [env=REMOTE_HOST:%{REMOTE_ADDR},PT]
+
+
+Listen 8843
+NameVirtualHost 0.0.0.0:8843
+<VirtualHost 0.0.0.0:8843>
+ ServerName mail.example.com
+ SSLEngine On
+
+        #mitigate beast attack
+        SSLHonorCipherOrder On
+        SSLCipherSuite ECDHE-RSA-AES128-SHA256:AES128-GCM-SHA256:RC4:HIGH:!MD5:!aNULL:!EDH
+
+        #   A self-signed (snakeoil) certificate can be created by installing
+        #   the ssl-cert package. See
+        #   /usr/share/doc/apache2.2-common/README.Debian.gz for more info.
+        #   If both key and certificate are stored in the same file, only the
+        #   SSLCertificateFile directive is needed.
+        SSLCertificateFile    /etc/ssl/private/mail.example.com.pem
+        SSLCertificateKeyFile /etc/ssl/private/mail.example.com.pem
+
+        #   Server Certificate Chain:
+        #   Point SSLCertificateChainFile at a file containing the
+        #   concatenation of PEM encoded CA certificates which form the
+        #   certificate chain for the server certificate. Alternatively
+        #   the referenced file can be the same as SSLCertificateFile
+        #   when the CA certificates are directly appended to the server
+        #   certificate for convinience.
+        SSLCertificateChainFile /etc/ssl/private/mail.example.com.pem
+
+ProxyRequests Off
+SetEnv proxy-nokeepalive 1
+ProxyPreserveHost On
+
+ProxyPassInterpolateEnv On
+#for CardDAV
+ProxyPass /principals http://127.0.0.1:20000/SOGo/dav/ interpolate
+ProxyPass /SOGo/dav/ http://127.0.0.1:20000/SOGo/dav/ interpolate
+ProxyPass / http://127.0.0.1:20000/SOGo/dav/ interpolate
+
+<Proxy http://127.0.0.1:20000>
+ RequestHeader set "x-webobjects-server-port" "8843"
+ RequestHeader set "x-webobjects-server-name" "mail.example.com:8843"
+ RequestHeader set "x-webobjects-server-url" "https://mail.example.com:8843"
+ RequestHeader set "x-webobjects-server-protocol" "HTTP/1.0"
+ RequestHeader set "x-webobjects-remote-host" "127.0.0.1"
+ AddDefaultCharset UTF-8
+ Order allow,deny
+ Allow from all
+</Proxy>
+
+</VirtualHost>
+
Jetzt muss noch SOGo gestartet und der Apache neu gestartet werden:
service sogo start
service apache2 restart
Ich hoffe mal, dass ich alle relevanten Einstellungen beschrieben habe. Kommentare gerne in den Kommentaren. 🙂
Ich habe kürzlich mein Mailsystem auf LDAP umgestellt und dann auch gleich noch SOGo installiert um CalDAV und CardDAV zu haben. Hauptsächlich zur Nachvollziehbarkeit für mich selbst sind hier die...


