Categories
Tech

Auto generate merge requests for new branches on Gitlab

I want to have a new merge request (MR) created for every branch in the feature/* namespace. It is possible to use push options to automatically create the branch, but every developer has to remember to use those options. I found this post on the Gitlab blog from 2017, that describes another way: Using Gitlab CI to check if there is a MR for a given branch, and if not create it.

I have adopted that solution, replaced python with jq to parse the API responses and used some predefined environment variables here and there, that didn’t exist at the time the original script was written.

# automatically open a MR for every feature/* branch
open_mr:
  rules:
    - if: $CI_COMMIT_BRANCH =~ /^feature/
  before_script: []   # We do not need any setup work, let's remove the global one (if any)
  stage: build
  image: everpeace/curl-jq
  script:
    # The description of our new MR, we want to remove the branch after the MR has
    # been closed
    - |-
      BODY="{
        \"id\":${CI_PROJECT_ID},
        \"source_branch\":\"${CI_COMMIT_REF_NAME}\",
        \"target_branch\":\"${CI_DEFAULT_BRANCH}\",
        \"remove_source_branch\":true,
        \"title\":\"WIP: ${CI_COMMIT_REF_NAME}\",
        \"assignee_id\":\"${GITLAB_USER_ID}\"
      }"
    # Require a list of all the merge request and take a look if there is already
    # one with the same source branch
    - LISTMR=`curl --silent "${CI_API_V4_URL}/projects/${CI_PROJECT_ID}/merge_requests?state=opened" --header "PRIVATE-TOKEN:${GITLAB_ACCESS_TOKEN}"`
    - HASBRANCHES=`echo ${LISTMR} | jq --raw-output 'any ( .source_branch =="'${CI_COMMIT_REF_NAME}'")'`

    # No MR found, let's create a new one
    - |-
      if [ ${HASBRANCHES} = "false" ]; then
        curl -X POST "${CI_API_V4_URL}/projects/${CI_PROJECT_ID}/merge_requests" --header "PRIVATE-TOKEN:${GITLAB_ACCESS_TOKEN}" --header "Content-Type:application/json" --data "${BODY}";
        echo "Opened a new merge request: WIP: ${CI_COMMIT_REF_NAME} and assigned to you";
        exit;
      fi
    - echo "No new merge request opened"

You need to define a variable GITLAB_ACCESS_TOKEN with an access token with API scope for this to work. Also if you use workflow rules, to limit when a pipeline is created, it needs to be configured to create pipelines for feature/* branches. For reference, this is what I am using:

# Run for every tag, MR and master. Also for every feature/* branch
workflow:
  rules:
    - if: $CI_MERGE_REQUEST_IID
    - if: $CI_COMMIT_TAG
    - if: $CI_COMMIT_BRANCH == $CI_DEFAULT_BRANCH
    - if: $CI_COMMIT_BRANCH =~ /^feature/

Categories
Tech

Configuring fail2ban for FreeSWITCH on BigBlueButton

BigBlueButton uses FreeSWITCH for its audio and SIP services. The log file was full of entries like the following:

2020-04-22 07:43:54.333827 [WARNING] sofia_reg.c:2929 Can't find user [7134@XXX.XXX.XXX.XXX] from YYY.YYY.YYY.YYY
You must define a domain called 'XXX.XXX.XXX.XXX' in your directory and add a user with the id="7134" attribute
and you must configure your device to use the proper domain in its authentication credentials.

After 2 days of having the server up and running, I had over 2G of log files. So I decided to use fail2ban to limit these unauthorized accesses. Fortunately fail2ban already contains a configuration for FreeSWITCH. The bbb-install.sh script installs FreeSWITCH in /opt/freeswitch, but fail2ban from the Ubuntu repositories is configured to look in /var/log/freeswitch.log. This can be fixed by the following configuration in the file /etc/fail2ban/jail.d/freeswitch.local:

[freeswitch]
enabled = true

# use freeswitch installed by bbb-install.sh
logpath  = /opt/freeswitch/log/freeswitch.log

# we do not want mail, so remove that action from standard jail.conf freeswitch config
action   = %(banaction)s[name=%(__name__)s-tcp, port="%(port)s", protocol="tcp", chain="%(chain)s", actname=%(banaction)s-tcp]
           %(banaction)s[name=%(__name__)s-udp, port="%(port)s", protocol="udp", chain="%(chain)s", actname=%(banaction)s-udp]

The change lead to lower CPU usage, disk throughput and less IOPS, due to the lower amount of writes to the log file. Also the log file is now much smaller and it is now actually usable to find any real errors. You can see the changes in the picture below. Fail2ban was installed and configured at about 07:30.

Display of CPU Usage, Disk Througput and IOPS before and after activating fail2ban for FreeSWITCH

Categories
Tech

Using 1und1 sip with FreeSWITCH

As we are currently in Corona times, I wanted to set up an instance of BigBlueButton (BBB) for our marching band, so that we can have board meetings without meeting in person.

Due to the limited internet access in some villages in the area here, I also wanted to provide a phone dial-in, so board members with slow internet connections could also join the meetings.

BBB uses FreeSWITCH internally for audio routing and it supports connecting a SIP account for dial-in. I am using 1und1* for my internet and phone service, so I wanted to use one of my numbers as dial-in number for BBB. Unfortunately 1und1 is a bit picky with the SIP settings it supports, just using my phone number and password was not enough. I would always get the following error message:

"403: Contact User und Anrufernummer verschieden"

Searching the net for the error message lead me to this old mail from 2012, with no solution. But it had the helpful information, that the contact-user header was not properly set for 1und1. Searching a bit more I found the correct configuration:

<include>
  <gateway name="sip.1und1.de">
    <param name="proxy" value="sip.1und1.de"/>
    <param name="username" value="4929719000000"/>
    <param name="password" value="YourSuperSecretPassword"/>
    <param name="register" value="true"/>
    <param name="extension" value="4929719000000"/>
    <param name="extension-in-contact" value="true"/>
  </gateway>
</include>

The important part is, that you need to specify your phone number in international format, both as username and as extension and set the extension-in-contact property to true. This configures FreeSWITCH to send the messages in a way that 1und1 expects.

I have a fully working dial-in to BBB now with one of my existing phone numbers, without any additional cost.

* Affiliation link, supporting our marching band

Categories
Tech

Install custom Operating Systems on soyoustart.com

OVH has a budget offering called So you start. If you want to install an operating system, that is not covered by the automatic installation, or want to encrypt your server, or install Linux with ZFS on root, you can’t use the provided installation mechanism. You can order a KVM over IP for additional costs to do the installation, or you can follow the following steps, to run the installation under Qemu/KVM. I took them from this forum entry, if you want to know more about it then click to read more:

#to see if Raid devices are present and stop them
cat /proc/mdstat
mdadm --stop /dev/md0
mdadm --stop /dev/md1

#Second step is to get rid of the network drives, because they are read-only
mount -t tmpfs -o size=6000m tmpfs /mnt # use 6GB of memory as temp - adjust as needed
mkdir /mnt/var
mkdir /mnt/var/cache
mkdir /mnt/var/lib
mkdir /mnt/var/run
mkdir /mnt/usr
mkdir /mnt/lib
rsync -a /var/cache/ /mnt/var/cache/
rsync -a /var/lib/ /mnt/var/lib/
rsync -a /var/run/ /mnt/var/run/
rsync -a /usr/ /mnt/usr/
rsync -a /lib/ /mnt/lib/
mount -B /mnt/var/cache /var/cache
mount -B /mnt/var/lib /var/lib
mount -B /mnt/var/run /var/run
mount -B /mnt/usr /usr

#Update your system
apt-get -y update
apt-get -y --force-yes upgrade

#Install qemu + kvm
apt-get -y install qemu kvm

Now that we have kvm installed, we can get for example an Ubuntu 14.04 Image and do the installation from there.

wget http://releases.ubuntu.com/14.04.1/ubuntu-14.04.1-desktop-amd64.iso

Now we start kvm with vnc support and do the installation from there:

qemu-system-x86_64 -net nic -net user,hostfwd=tcp::80-:80 -m 2047M -alt-grab -localtime -enable-kvm -cpu kvm64,+nx -smp 2 -usbdevice tablet -k en-us -cdrom ubuntu-14.04.1-desktop-amd64.iso -hda /dev/sda -hdb /dev/sdb -vnc 127.0.0.1:0

The VNC Server will listen on localhost only, so that no one else can access it. You need to tunnel yourself with SSH through.

This is also helpful to start your server under KVM, to fix any boot issues you might have.


Categories
Tech

Ubuntu 14.04 LUKS Encrypted ZFS Root

Install the ZFS native repository for Ubuntu:

apt-add-repository --yes ppa:zfs-native/stable
apt-get update
apt-get install debootstrap ubuntu-zfs

We need a small partition for grub and a small RAID for the unencrypted /boot partition. I create an additional very small raid, with a LUKS container inside, so that all keys can be derived from that. The rest of the space is for the LUKS container with a ZFS pool and the root filesystem inside.

parted -s -a optimal /dev/sda mklabel gpt
parted -s -a minimal /dev/sda mkpart primary 1MiB 2MiB
parted -s -a optimal /dev/sda set 1 bios_grub on
parted -s -a optimal /dev/sda mkpart primary 2MiB 200MiB
parted -s -a optimal /dev/sda set 2 raid on
parted -s -a optimal /dev/sda mkpart primary 200MiB 220MiB
parted -s -a optimal /dev/sda set 3 raid on
parted -s -a optimal /dev/sda mkpart primary 220MiB 100%

parted -s -a optimal /dev/sdb mklabel gpt
parted -s -a minimal /dev/sdb mkpart primary 1MiB 2MiB
parted -s -a optimal /dev/sdb set 1 bios_grub on
parted -s -a optimal /dev/sdb mkpart primary 2MiB 200MiB
parted -s -a optimal /dev/sdb set 2 raid on
parted -s -a optimal /dev/sdb mkpart primary 200MiB 220MiB
parted -s -a optimal /dev/sdb set 3 raid on
parted -s -a optimal /dev/sdb mkpart primary 220MiB 100%

Next we create the raid

apt-get install mdadm --no-install-recommends
mdadm --create --verbose /dev/md/0 --level=1 --raid-devices=2 /dev/sda2 /dev/sdb2
#Answer Yes, if asked for 1.x metadata format
mdadm --create --verbose /dev/md/1 --level=1 --raid-devices=2 /dev/sda3 /dev/sdb3
#Answer Yes, if asked for 1.x metadata format

And then create the LUKS containers

cryptsetup luksFormat -l 512 -c aes-xts-plain64 -h sha512 /dev/md/1
cryptsetup luksOpen /dev/md/1 cryptroot
/lib/cryptsetup/scripts/decrypt_derived cryptroot | cryptsetup -s 512 -c aes-xts-plain64 -h sha512 luksFormat /dev/sda4
/lib/cryptsetup/scripts/decrypt_derived cryptroot | cryptsetup luksOpen /dev/sda4 crypt1
/lib/cryptsetup/scripts/decrypt_derived cryptroot | cryptsetup -s 512 -c aes-xts-plain64 -h sha512 luksFormat /dev/sdb4
/lib/cryptsetup/scripts/decrypt_derived cryptroot | cryptsetup luksOpen /dev/sdb4 crypt2

Create the zpool

zpool create -O mountpoint=none -o ashift=12 rpool mirror /dev/mapper/crypt1 /dev/mapper/crypt2
zfs create -o mountpoint=/ rpool/ROOT
zfs create -o mountpoint=none rpool/DATA
zpool set bootfs=rpool/ROOT rpool
zpool export rpool
zpool import -R /mnt rpool

install the base system

debootstrap saucy /mnt
mount --bind /dev/ /mnt/dev

Change into the new system

chroot /mnt /bin/bash --login

You are inside the new system now.

mkfs.ext4 /dev/mapper/cryptroot
mkfs.ext4 /dev/md0 
mount /dev/md0 /boot
mount -t proc proc /proc
mount -t sysfs sysfs /sys
ln -sf /dev/mapper/cryptroot /dev/cryptroot
ln -sf /dev/mapper/crypt1 /dev/crypt1
ln -sf /dev/mapper/crypt2 /dev/crypt2

locale-gen $LANG
locale-gen en_US.UTF-8

apt-get update
apt-get install software-properties-common

apt-add-repository --yes ppa:zfs-native/stable
apt-get update

apt-get install linux-image-server linux-headers-server ubuntu-minimal

apt-get install ubuntu-zfs cryptsetup

apt-get install mdadm --no-install-recommends
grub-install /dev/sda
grub-install /dev/sdb

apt-get install zfs-initramfs

echo "cryptroot UUID=$(blkid /dev/md/1 -s UUID -o value) none luks">> /etc/crypttab
echo "crypt1 UUID=$(blkid /dev/sda4 -s UUID -o value) cryptroot luks,keyscript=/lib/cryptsetup/scripts/decrypt_derived" >> /etc/crypttab 
echo "crypt2 UUID=$(blkid /dev/sdb4 -s UUID -o value) cryptroot luks,keyscript=/lib/cryptsetup/scripts/decrypt_derived" >> /etc/crypttab

echo "UUID=$(blkid /dev/md0 -s UUID -o value) /boot ext4 rw,relatime,stripe=4,data=ordered 0 0"> /etc/fstab
#we need a fake root system so that the crypt tools get added to the initramfs
#we cannot use /dev/mapper/cryptroot, since the initramfs is missing the derived script then...
echo "/dev/mapper/crypt1 / none none 0 0">> /etc/fstab

echo "target=cryptroot,source=UUID=$(blkid /dev/md/1 -s UUID -o value),key=none,rootdev"> /etc/initramfs-tools/conf.d/cryptroot
echo "target=crypt1,source=UUID=$(blkid /dev/sda4 -s UUID -o value),key=cryptroot,keyscript=/lib/cryptsetup/scripts/decrypt_derived,rootdev" >> /etc/initramfs-tools/conf.d/cryptroot
echo "target=crypt2,source=UUID=$(blkid /dev/sdb4 -s UUID -o value),key=cryptroot,keyscript=/lib/cryptsetup/scripts/decrypt_derived,rootdev" >> /etc/initramfs-tools/conf.d/cryptroot

update-initramfs -u -k all

sed -i 's|GRUB_CMDLINE_LINUX_DEFAULT="quiet splash"|GRUB_CMDLINE_LINUX_DEFAULT="boot=zfs noplymouth"|' /etc/default/grub

update-grub

adduser <myuser>
adduser <myuser> sudo

/etc/init.d/mdadm stop
umount /boot
umount /sys
umount /proc
exit

You are back in the host system now

umount /mnt/dev
zpool export rpool
reboot

Unlock your server via SSH

apt-add-repository universe
apt-get update

apt-get install openssh-server
#make sure that openssh-server is installed before dropbear
apt-get install dropbear

#use the same host key in initramfs as in real system
cp /etc/dropbear/dropbear_dss_host_key /etc/initramfs-tools/etc/dropbear/dropbear_dss_host_key
cp /etc/dropbear/dropbear_rsa_host_key /etc/initramfs-tools/etc/dropbear/dropbear_rsa_host_key

#add your public keys to /etc/initramfs-tools/root/.ssh/authorized_keys

Add the file /etc/initramfs-tools/hooks/unlock with the following contents:

#!/bin/sh -e

PREREQS=""

prereqs() { echo "$PREREQS"; }

case "$1" in
    prereqs)
    prereqs
    exit 0
    ;;
esac

## hook-functions provides copy_exec()
. /usr/share/initramfs-tools/hook-functions

echo "/sbin/cryptsetup luksOpen /dev/md/1 cryptroot">$DESTDIR/bin/unlock
echo 'kill $(pidof cryptsetup)'>>$DESTDIR/bin/unlock
echo 'kill $(pidof plymouth)'>>$DESTDIR/bin/unlock

chmod a+x $DESTDIR/bin/unlock


chmod a+x /etc/initramfs-tools/hooks/unlock
update-initramfs -u -k all

You can now log into your initramfs during boot via shh with the root user and unlock the disks by calling:

unlock
exit


Categories
Tech

Running Raspbian on Qemu with libvirt

I followed this great tutorial to get Raspbian running on Qemu. I have all my other virtual servers managed by libvirt, so I wanted to integrate  the Raspbian Qemu instance into it.

Here is my working libvirt xml for a headless installation:

<domain type='qemu' id='3' xmlns:qemu='http://libvirt.org/schemas/domain/qemu/1.0'><!--We need the qemu extensions, to be able to set a custom cpu-->
  <name>arm1</name>
  <uuid>dde875c8-d86f-4aa2-abce-b76ee5cc1032</uuid>
  <memory unit='KiB'>262144</memory>
  <currentMemory unit='KiB'>262144</currentMemory>
  <vcpu placement='static'>1</vcpu>
  <resource>
    <partition>/machine</partition>
  </resource>
  <os>
    <type arch='armv7l' machine='versatilepb'>hvm</type><!--libvirt does not know about armv6l, so use armv7l. The custom cpu setting will choose the correct architecture anyway-->
    <kernel>/var/lib/libvirt/boot/zImage_3.10.26_arm6l</kernel><!--The kernel from http://xecdesign.com/qemu-emulating-raspberry-pi-the-easy-way/ -->
    <cmdline>root=/dev/sda2 panic=1 rootfstype=ext4 console=ttyAMA0</cmdline><!--Select the correct root file system from the Raspbian image. Also set the console, so that we can see something-->
    <boot dev='hd'/>
  </os>
  <clock offset='utc'/>
  <on_poweroff>destroy</on_poweroff>
  <on_reboot>restart</on_reboot>
  <on_crash>restart</on_crash>
  <devices>
    <emulator>/usr/bin/qemu-system-arm</emulator>
    <disk type='file' device='disk'>
      <driver name='qemu' type='raw'/>
      <source file='/var/lib/libvirt/images/2014-01-07-wheezy-raspbian.img'/>
      <target dev='hda' bus='scsi'/>
      <alias name='scsi0-0-2'/>
      <address type='drive' controller='0' bus='0' target='0' unit='2'/>
    </disk>
    <controller type='usb' index='0'>
      <alias name='usb0'/>
      <address type='pci' domain='0x0000' bus='0x00' slot='0x01' function='0x2'/>
    </controller>
    <controller type='pci' index='0' model='pci-root'>
      <alias name='pci.0'/>
    </controller>
    <controller type='scsi' index='0'>
      <alias name='scsi0'/>
      <address type='pci' domain='0x0000' bus='0x00' slot='0x04' function='0x0'/>
    </controller>
    <interface type='network'>
      <mac address='52:54:00:50:2f:ce'/>
      <source network='default'/>
      <target dev='vnet0'/>
      <model type='smc91c111'/><!--This is the network card, supported by the raspberry pi-->
      <alias name='net0'/>
      <address type='pci' domain='0x0000' bus='0x00' slot='0x01' function='0x0'/>
    </interface>
    <serial type='pty'>
      <source path='/dev/pts/16'/>
      <target port='0'/>
      <alias name='serial0'/>
    </serial>
    <console type='pty' tty='/dev/pts/16'>
      <source path='/dev/pts/16'/>
      <target type='serial' port='0'/>
      <alias name='serial0'/>
    </console>
    <sound model='es1370'>
      <alias name='sound0'/>
      <address type='pci' domain='0x0000' bus='0x00' slot='0x02' function='0x0'/>
    </sound>
  </devices>
  <qemu:commandline><!--we need to set a custom cpu-->
    <qemu:arg value='-cpu'/>
    <qemu:arg value='arm1176'/>
  </qemu:commandline>
</domain>

I took the kernel from the tutorial mentioned above, and also prepared the image according to the tutorial.

I haven’t tried to get graphics support to work.

This xml works fine for me with Ubuntu 14.04 as host.

Categories
Tech

Ubuntu 13.10 LUKS Encypted ZFS Root on HP N54L

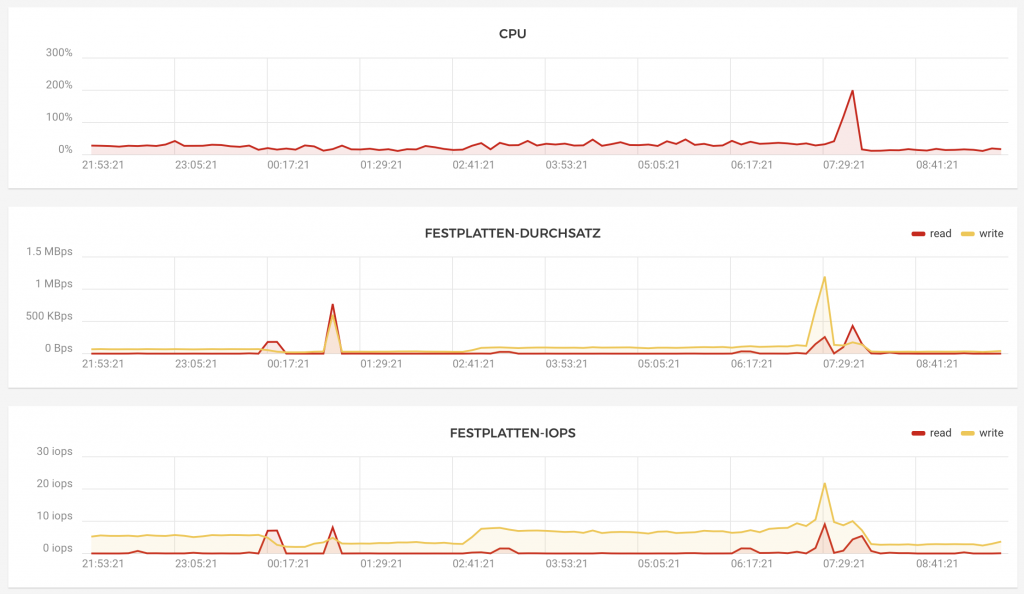
This guide installs a ZFS mirror on LUKs encrypted containers. This leads to a performance hit, since writing requires each block of data to be encrypted twice. Addituionally the HP N54L has no AES CPU instruction. All IO is very CPU bound after this. I get a write throughput of about 8M/s. I am using the system to receive ZFS backups via zfs send/receive over a DSL connection. This is working fine since the connection speed is much slower than the writing speed. This setup is not for you if you need faster write speeds.

I used the Ubuntu 13.10 64bit Desktop Live CD and copied it to an USB stick with dd. Creating the USB stick with tools like unetbootin will not work, since the HP N54L will think it is a floppy and halt at the syslinux stage.

Install the ZFS native repository for Ubuntu:

apt-add-repository --yes ppa:zfs-native/stable
apt-get update
apt-get install debootstrap ubuntu-zfs

I have 2 WD Red 4 TB disks in the system. We need a small partition for grub and a small RAID for the unencrypted /boot partition. I create an additional very small raid, with a LUKS container inside, so that all keys can be derived from that. The rest of the space is for the LUKS container with a ZFS pool and the root filesystem inside.

parted -a optimal /dev/sda mklabel gpt
parted -a minimal /dev/sda mkpart primary 1MiB 2MiB
parted -a optimal /dev/sda set 1 bios_grub on
parted -a optimal /dev/sda mkpart primary 2MiB 200MiB
parted -a optimal /dev/sda set 2 raid on
parted -a optimal /dev/sda mkpart primary 200MiB 220MiB
parted -a optimal /dev/sda set 3 raid on
parted -a optimal /dev/sda mkpart primary 220MiB 100%

parted -a optimal /dev/sdb mklabel gpt
parted -a minimal /dev/sdb mkpart primary 1MiB 2MiB
parted -a optimal /dev/sdb set 1 bios_grub on
parted -a optimal /dev/sdb mkpart primary 2MiB 200MiB
parted -a optimal /dev/sdb set 2 raid on
parted -a optimal /dev/sdb mkpart primary 200MiB 220MiB
parted -a optimal /dev/sdb set 3 raid on
parted -a optimal /dev/sdb mkpart primary 220MiB 100%

Next we create the raid

apt-get install mdadm --no-install-recommends
mdadm --create --verbose /dev/md/0 --level=1 --raid-devices=2 /dev/sda2 /dev/sdb2
#Answer Yes, if asked for 1.x metadata format
mdadm --create --verbose /dev/md/1 --level=1 --raid-devices=2 /dev/sda3 /dev/sdb3
#Answer Yes, if asked for 1.x metadata format

And then create the LUKS containers

cryptsetup luksFormat -l 512 -c aes-xts-plain64 -h sha512 /dev/md/1
cryptsetup luksOpen /dev/md/1 cryptroot
/lib/cryptsetup/scripts/decrypt_derived cryptroot | cryptsetup -s 512 -c aes-xts-plain64 -h sha512 luksFormat /dev/sda4
/lib/cryptsetup/scripts/decrypt_derived cryptroot | cryptsetup luksOpen /dev/sda4 crypt1
/lib/cryptsetup/scripts/decrypt_derived cryptroot | cryptsetup -s 512 -c aes-xts-plain64 -h sha512 luksFormat /dev/sdb4
/lib/cryptsetup/scripts/decrypt_derived cryptroot | cryptsetup luksOpen /dev/sdb4 crypt2

Create the zpool

zpool create -O mountpoint=none -o ashift=12 rpool mirror /dev/mapper/crypt1 /dev/mapper/crypt2
zfs create -o mountpoint=/ rpool/ROOT
zfs create -o mountpoint=none rpool/DATA
zpool set bootfs=rpool/ROOT rpool
zpool export rpool
zpool import -R /mnt rpool

install the base system

debootstrap saucy /mnt
mount --bind /dev/ /mnt/dev

The HP N54L needs the uhci-hcd module in the initramfs. The release version of initramfs-tools is broken. There is an update in the proposed section, that fixes this. Without you won’t be able to enter your password on boot.

wget http://launchpadlibrarian.net/154931909/initramfs-tools-bin_0.103ubuntu1.1_amd64.deb
wget http://launchpadlibrarian.net/154931949/initramfs-tools_0.103ubuntu1.1_all.deb
mv initramfs-tools* /mnt/
chroot /mnt /bin/bash --login
dpkg -i initramfs-tools*
exit

Change into the new system

chroot /mnt /bin/bash --login

You are inside the new system now.

mkfs.ext4 /dev/mapper/cryptroot
mkfs.ext4 /dev/md0 
mount /dev/md0 /boot
mount -t proc proc /proc
mount -t sysfs sysfs /sys
ln -sf /dev/mapper/cryptroot /dev/cryptroot
ln -sf /dev/mapper/crypt1 /dev/crypt1
ln -sf /dev/mapper/crypt2 /dev/crypt2

locale-gen $LANG
locale-gen en_US.UTF-8

apt-get update
apt-get install software-properties-common

apt-add-repository --yes ppa:zfs-native/stable
apt-add-repository --yes ppa:zfs-native/grub
#At the time of writing, no saucy ifs grub was released, edit /etc/apt/sources.list.d/zfs-native-grub-saucy.list to use the raring version
sed -i 's|saucy|raring|' /etc/apt/sources.list.d/zfs-native-grub-saucy.list
apt-get update

apt-get install linux-image-server linux-headers-server ubuntu-minimal
#skip installation of grub for now

apt-get install ubuntu-zfs cryptsetup

apt-get install mdadm --no-install-recommends
apt-get install grub-pc mountall
#grub will be downgraded
grub-install /dev/sda
grub-install /dev/sdb

apt-get install zfs-initramfs

echo "cryptroot UUID=$(blkid /dev/md/1 -s UUID -o value) none luks">> /etc/crypttab
echo "crypt1 UUID=$(blkid /dev/sda4 -s UUID -o value) cryptroot luks,keyscript=/lib/cryptsetup/scripts/decrypt_derived" >> /etc/crypttab 
echo "crypt2 UUID=$(blkid /dev/sdb4 -s UUID -o value) cryptroot luks,keyscript=/lib/cryptsetup/scripts/decrypt_derived" >> /etc/crypttab

echo "UUID=$(blkid /dev/md0 -s UUID -o value) /boot ext4 rw,relatime,stripe=4,data=ordered 0 0"> /etc/fstab
#we need a fake root system so that the crypt tools get added to the initramfs
#we cannot use /dev/mapper/cryptroot, since the initramfs is missing the derived script then...
echo "/dev/mapper/crypt1 / none none 0 0">> /etc/fstab

echo "target=cryptroot,source=UUID=$(blkid /dev/md/1 -s UUID -o value),key=none,rootdev"> /etc/initramfs-tools/conf.d/cryptroot
echo "target=crypt1,source=UUID=$(blkid /dev/sda4 -s UUID -o value),key=cryptroot,keyscript=/lib/cryptsetup/scripts/decrypt_derived,rootdev" >> /etc/initramfs-tools/conf.d/cryptroot
echo "target=crypt2,source=UUID=$(blkid /dev/sdb4 -s UUID -o value),key=cryptroot,keyscript=/lib/cryptsetup/scripts/decrypt_derived,rootdev" >> /etc/initramfs-tools/conf.d/cryptroot

update-initramfs -u -k all

sed -i 's|GRUB_CMDLINE_LINUX_DEFAULT="quiet splash"|GRUB_CMDLINE_LINUX_DEFAULT="noplymouth"|' /etc/default/grub

update-grub

adduser <myuser>
adduser <myuser> sudo

/etc/init.d/mdadm stop
umount /boot
umount /sys
umount /proc
exit

You are back in the host system now

umount /mnt/dev
zpool export rpool
reboot

 Rescue Mode

Boot the lived again and then:

apt-add-repository --yes ppa:zfs-native/stable
apt-get update
apt-get install debootstrap ubuntu-zfs
apt-get install mdadm --no-install-recommends

mdadm --assemble /dev/md/0
mdadm --assemble /dev/md/1

cryptsetup luksOpen /dev/md/1 cryptroot
/lib/cryptsetup/scripts/decrypt_derived cryptroot | cryptsetup luksOpen /dev/sda4 crypt1
/lib/cryptsetup/scripts/decrypt_derived cryptroot | cryptsetup luksOpen /dev/sdb4 crypt2

zpool import -R /mnt rpool

mount --bind /dev/ /mnt/dev
chroot /mnt /bin/bash --login

mount /dev/md0 /boot
mount -t proc proc /proc
mount -t sysfs sysfs /sys
ln -sf /dev/mapper/cryptroot /dev/cryptroot
ln -sf /dev/mapper/crypt1 /dev/crypt1
ln -sf /dev/mapper/crypt2 /dev/crypt2

To leave the system again:

umount /boot
umount /sys
umount /proc
exit
umount /mnt/dev
zpool export rpool


Optionally unlock your server via SSH

apt-add-repository universe
apt-get update

apt-get install openssh-server
#make sure that openssh-server is installed before dropbear
apt-get install dropbear

#use the same host key in initramfs as in real system
cp /etc/dropbear/dropbear_dss_host_key /etc/initramfs-tools/etc/dropbear/dropbear_dss_host_key
cp /etc/dropbear/dropbear_rsa_host_key /etc/initramfs-tools/etc/dropbear/dropbear_rsa_host_key

#add your public keys to /etc/initramfs-tools/root/.ssh/authorized_keys

Add the file /etc/initramfs-tools/hooks/unlock with the following contents:

#!/bin/sh -e

PREREQS=""

prereqs() { echo "$PREREQS"; }

case "$1" in
    prereqs)
    prereqs
    exit 0
    ;;
esac

## hook-functions provides copy_exec()
. /usr/share/initramfs-tools/hook-functions

echo "/sbin/cryptsetup luksOpen /dev/md/1 cryptroot">$DESTDIR/bin/unlock
echo 'kill $(pidof cryptsetup)'>>$DESTDIR/bin/unlock
echo 'kill $(pidof plymouth)'>>$DESTDIR/bin/unlock

chmod a+x $DESTDIR/bin/unlock


chmod a+x /etc/initramfs-tools/hooks/unlock
update-initramfs -u -k all

You can now log into your initramfs during boot via shh with the root user and unlock the disks by calling:

unlock
exit

Final remarks

You should probably backup your LUKs headers and store them in a safe place:

cryptsetup luksHeaderBackup /dev/md/1 --header-backup-file md1.luks
cryptsetup luksHeaderBackup /dev/sda4 --header-backup-file sda4.luks
cryptsetup luksHeaderBackup /dev/sdb4 --header-backup-file sdb4.luks

If you have sugustions on how to improve this setup, feel free to post them in the comments.

Sources

http://www.larsko.org/ZfsUbuntu

http://blog.neutrino.es/2011/unlocking-a-luks-encrypted-root-partition-remotely-via-ssh/

http://wiki.ubuntuusers.de/LUKS

CR004 – Windows Phone 8 – Lorem ipsum

Einleitung
* Hatte das mal als 30 Tage Podcast geplant
* Habe nicht die Häufigkeit geschaft die ich wollte
* Werde einfach sporadisch weitermachen, wenn mir was auffällt

Kalendar:
* Monatsansicht – ohne Worte

Benachrichtigungen:
* Keine Übersicht über alle Benachrichtigungen
* Markierungen nur in den Kacheln
* Einstellungen nur in den Apps, nicht global

Entwicklung:
* kostenlose Version von Visual Studio für Windows Phone Entwicklung
* Testen auf dem Gerät nur mit Entwickleraccount, zur Zeit 15€
* Emulator braucht Virtualisierungssupport
** VmWare und Parallels sollen gehen mit spezieller Konfiguration
** VirtualBox hat kein nested Virtualisation
** KVM hat nested Virtualisation, aber kann eigene Virtualisierng nicht verstecken
* Entwicklung ist sonst mit Virtualisiertem WIndows kein Problem
* C# ist aus der Java Welt kommend leicht zu lernen
* Grafischer GUI Builder
* komische Beschränkungen im WebbrowserControl
** kein PDF
** keine SVGs, CSS und Javascripts als Link im HTML vom isolated storage
** Aber SVG direkt vom isolated Storage geht
** SVG inline in HTML ist kaputt
* Audio vom isolated Storage

CR003 – Windows Phone 8 – Tag 10

Allgemein:
– Listen schieben sich zusammen, wenn man ans Ende gelangt
– Standartdesign beim HTC:
– Rot auf schwarz, ist hässlich
– Weißer Hintergrund ist zu hell
– Ohne Home Button, daher Telefon oft falsch rum und finde dann den Anknopf nicht
– IMAP-Ordner für Papierkorb, Drafts und Gesendete Emails lassen sich nicht auswählen
– keine Möglichkeit Apps in Ordnern zu Organisieren
– Nur wichtige Apps als Kachel auf den Startscreen
– alle anderen sind in einer Liste
– Suchknopf macht nur Websuche, Musik? und Barcodes
– Suche nach Applikationen nur in der Applikationsliste
– Suche nach Kontakten nur in der Kontakte App
– Spiele ignorieren (oft?) Mute Einstellung

Store und Spiele:
– Demoversionen möglich
– Gefühlt unübersichtlich
– War verwirrt über Spielekategorie Xbox
– dachte man bräuchte da eine Xbox zu, tut man aber nicht
– Ist das was bei Apple Game Center ist
– Spiele werden in eine Spielesammlung installiert
– Entählt auch die Achievements
– Musicapp sagt es gäbe Podcasts im Store
– finde aber keine
– finde auch sonst keine Möglichkeit Podcasts hinzuzufügen
– RSS Links öffnen im IE und zeigen XML

CR002 – Windows Phone 8 – Tag 4

Allgemein:

  • Links Rechts Swipe zum View wechseln
  • In Listen Kontextmenü mit Tap und Hold
  • Kein Pull to refresh
  • Kinderecke
    • nach Rechts swipen
    • Beliebige Applikationen können abgelegt werden
    • ohne Passcode
    • auch nützlich ohne Kinder, z.B. Taschenlampe
  • Dateizugriff unter Linux

Software updates:

  • Keine informationen von welcher auf welche Version
  • Keine Release Notes
  • OTA

Kalendar:

  • Nicht zu gebrauchen
  • Keine Wochenansicht
  • Monatsansicht
    • alles viel zu klein
    • keine Kalendarfarben
  • Tagesansicht
    • Tagesübergreifende Termine: Man sieht das da was ist, aber nicht was
    • Unendlich durchscrollen
  • Aus Lockscreen wird der nächste Termin gezeigt
  • CalDAV/CardDAV soll nur für Google Accounts kommen